Tuesday, June 7, 2011

Pre-visualization! Multiple exposures, layers and masks.

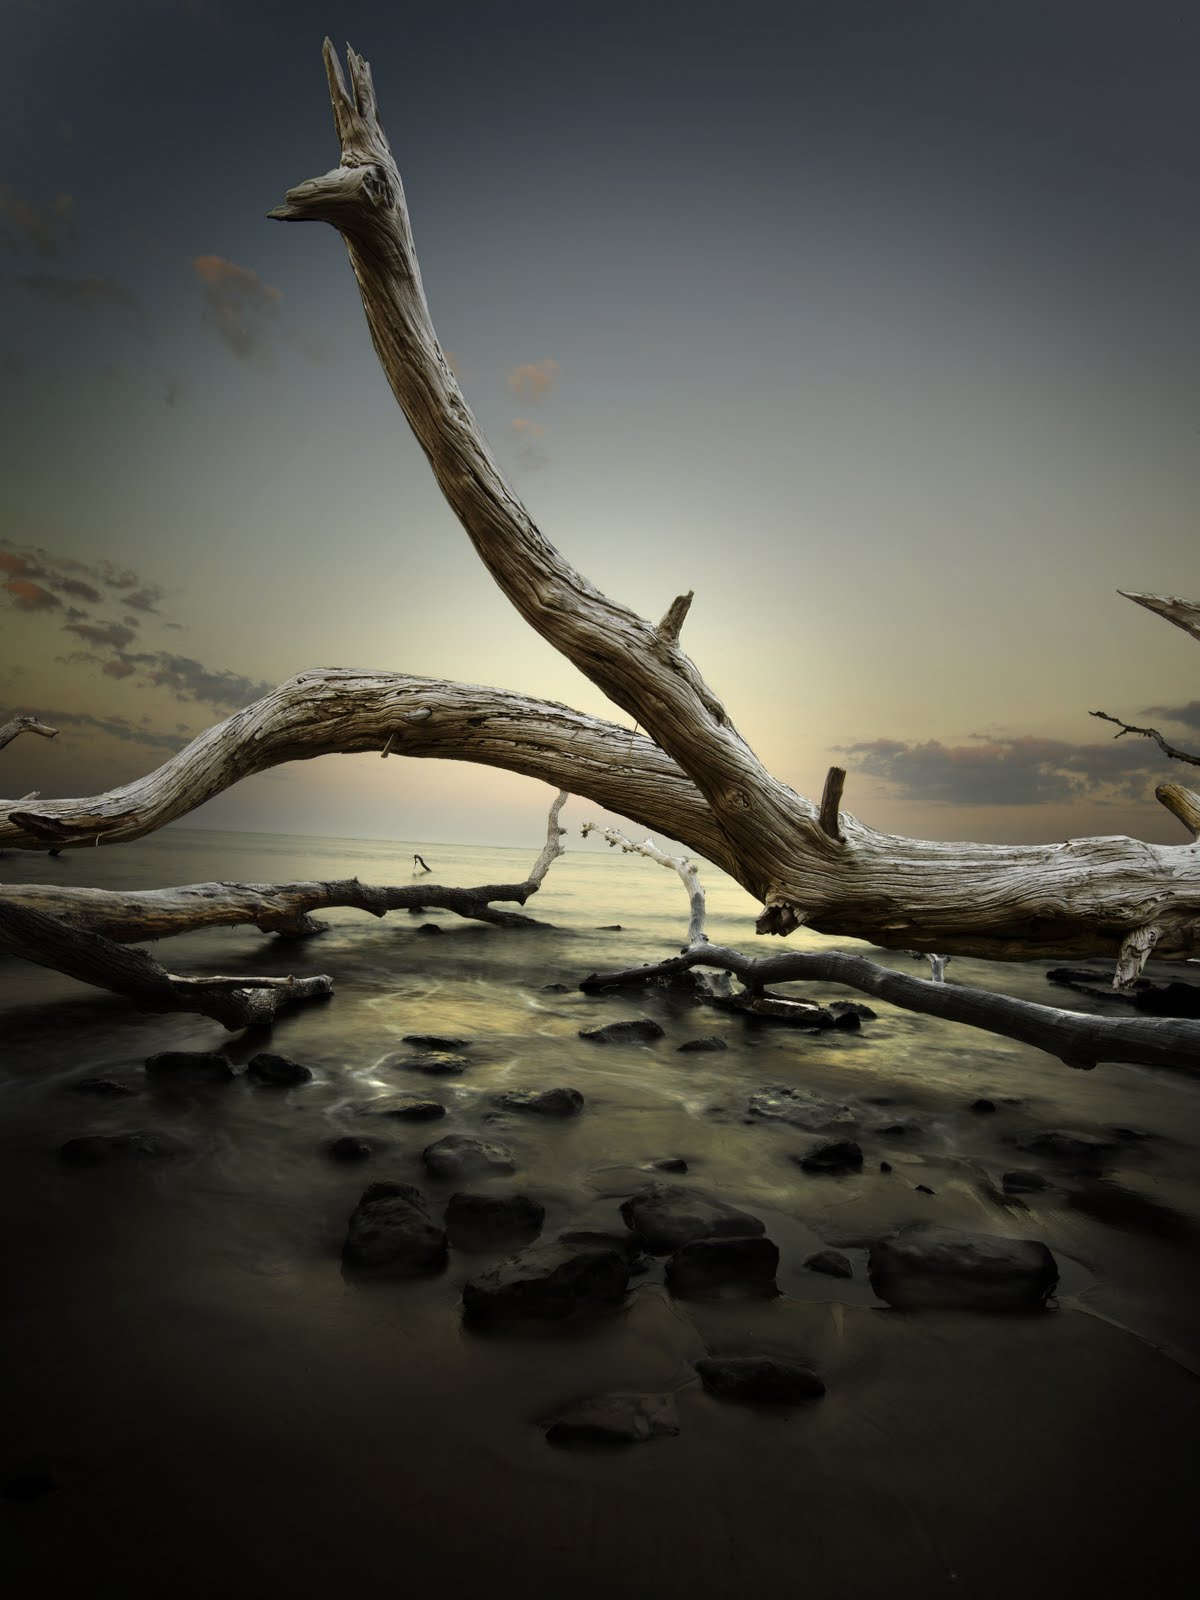
Recently I traveled just north of Jacksonville Florida.
To photograph a spot I have heard about for years, Talbot Island and little Talbot Island.
These two little Islands have lots of tranquil views that are like falling into dreams.
On Talbot Island there is a cliff with fallen trees right on the ocean.
A fantastic place to find that perfect image.

When I photograph my subjects I tend to work with multiple exposures, layers and masks.
This comes from years ago (before photoshop)  when I had to make pin registered masks in the darkroom to manipulate photographs into imagery.
Stop take a moment and look at what your about to take a picture of, think about it.
I know what and how I want an image to look like before I shoot it (pre-visualization).


So here is the image that I pre-visualized
I will show you the steps I had in mind to get it here.
I used two exposures in this image.


The base image.
(What it looked like at that moment)


The first step is to make a mask on the second exposure 
just showing the tree and rocks.


Here is what it looks like applied.


Levels adjustments were made on the tree layer
and base layer to bring it up to what I saw in my mind.


Here is what that looks like


A final vignette mask was made to complete the image.


Pre-Visualization is something I suggest everyone do.
Just clicking the shutter is a snapshot.
Manipulating it to what you see in your mind's eye is
Creating Imagery!


Wednesday, May 25, 2011

Getting the shot no mater what it takes.

Recently I was asked to shoot an outdoor architectural image on a day when I knew it would not be what they were asking for.

But I knew I could make it work by shooting multiple images and selectively merging them.
I started early in the morning 5:30 AM before sun up and worked with the engineers to find the correct lights to turn on and off for the correct base exposure.

First we will start with an image of the lights on the building and trees.

The next step is to add a layer mask to blend the correct exposure on the foreground foliage
Here is the mask.
 Here is what it looks like

.
The next step is to build a layer for the sky to show the sunrise as the client requested.
Here is the mask
Here is what it looks like
To finish it up we need to skew the image and
put the reflection of the sunrise in windows.
Make a few more adjustments as requested by the client.
 we're done!
I like the sky in the previous image but the client wanted this sky.
Always provide what the client wants!
You should show him some other options as well so he can make that educated decision.


Monday, November 1, 2010

Fall Has Arrived!

Smokey Mountain National Park.

Fall, the Smokey Mountains and the changing of the leaves, Fantastic!
No matter how many times I visit this area I am amased at how the years and times I visit give me a different preview of this land. I mainly stayed in the Gatlinburg area focusing on Cades Cove to the south west and the Little Pigeon River just to the north of town. I focused on Video this trip but here are a few images of what I was surrounded by. Wildlife Galore and breathtaking views painted by the master himself.
ENJOY!!


Wednesday, March 10, 2010

Creating a previsualised image. (What my mind saw)


In creating the image I had in mind, I would need several photographs. To really get what I wanted, it was not possible to shoot one image and have it come out the way I saw it in my mind. Timing, available crew, restaurant policies etc. played a part in how this image had to be created. I took five basic images I knew I would need: sky, pavement, car, car's undercarriage and the horizon reflection in the body of the car. Along with a few adjustment layers (color balance and levels) I got the shot I previsualized.

I started with capturing the horizon reflection in the car (a half hour before sun set) and then the sky I wanted (just after sunset). Moving on we set about lighting the car, building and truck behind the car which took some time to get it where I liked it.

To create the image I wanted, I took the base shot of the car then added the other Images to it by copying and pasting as layers. Using the pen tool I outlined the necessary areas of each layer/image and deleted the rest of that layer/image so the different layers would show through.

This is the base image I chose
I used this image because it is lit the way I wanted the car, truck and building to be lit. You can see in the reflection on the side of the car my assistants. He needed to be there to hold up the boom which you can see in the upper right hand corner of the image. The boom is lighting the car from above, illuminating the rooftop and hood of the car. There are three other lights also:  two on the right side and one on the front of the car.

I started by retouching the obvious parking signs behind the car, some of the light reflections on the building and taking out the yellow umbrellas and a street light.


The next step was adding the Pavement. This was done for a smooth normal looking pavement. As you can see from above the lighting of the car casts lots of reflections.


A few adjustment layers (color balance and levels) to the pavement made it look believable.


Moving on, I worked on the reflection in the side of the car, darkening the truck and retouching the remaining signs as well as adding the undercarriage. The reflection was added by simply placing the reflection layer behind the main layer  and using the eraser tool on low opacity to remove the front layer in the areas I saw fit.

Finally it was time to add the sky and tweak the layers for a final image.
I hope you have enjoyed this little bit of insight into how I created this image.
Stop back from time to time as I demonstrate with other shots how I create my images.

Monday, March 1, 2010

Medical shoots!

What fun it is to photograph for the many faces a medical company might have.
This particular company markets in many ways to many facets of the industry.
Even though the backgrounds are the same in several of the shots. they will not cross over in their marketing.
Because of this they can get several images for several different markets from the same set.
To begin with I discuss  the different products with the client and art director, coming up with a game plan that works for all the products. Then I light the set and begin the shooting.
Here are some examples of the images we shot over a two day period.

Sunday, January 31, 2010

FREE! ASMP EVENT @ IADT

ASMP is providing a workshop for IADT's Digital Boot Camp.

February 4th 2010 Peter Krogh is coming to IADT (International Academy of Design and Technologies)
He is giving a free workshop on dpBestflow.

dpBestflow is the new guide for every aspect of digital imaging technology from ASMP, the leader in education for the professional photographer.

The event is from 6-8pm on February 4th,  third floor of IADT 5104 Eisenhower Blvd Tampa, Florida 33634


dpBestflow Project Overview


Background

In August of 2007, the American Society of Media Photographers (ASMP) was awarded funds by the United States Library of Congress through its National Digital Information Infrastructure and Preservation Program (NDIIPP) for the Digital Photography Best Practices and Workflow (dpBestflow) project. ASMP assembled a team of experts and thought leaders to research ways to streamline and improve the process, production and preservation of commercial digital artwork. Two important publications have been used in the team’s work:
Digital Photography Best Practices and Workflow Handbook (Focal Press, 2009) by Richard Anderson and Patti Russotti (dpBestflow Project Director and Contributing Author, respectively). Richard Anderson is a key participant in the dpBestflow project. The book presents workflow practices for planning, capturing and archiving digital photography.
The DAM Book (O'Reilly Media, 2009): Author Peter Krogh (dpBestflow Senior Project Manager) is another key member of the dpBestFlow team. His book on Digital Asset Management is an essential guide for photographers moving from film to digital and shows how all the components of a digital photo library fit together into a comprehensive system.

Purpose

The purpose of dpBestflow is twofold:
  • To create guidelines for refined production workflows, archiving methods, and best practices for digital photography based on a variety of capture methods and intended image use. The guidelines will be developed on the basis of research, analysis of software products and other tools targeted at professional photographers.
  • To publish the dpBestflow as a website open to the public. The adoption of the dpBestflow guidelines will be promoted to the professional photography community and the public through programming at industry trade shows and a nationwide series of training events at ASMP chapters, trade shows, and educational institutions.

dpBestflow.org Content

dpBestflow.org is a rich web resource which includes a series of on-line educational seminars, software & hardware solutions, workflow guides and book references, designed to match a wide variety of working styles. Now, by accessing the web site, photographers and others in the visual arts community have real-world solutions for preserving the quality and integrity of digital images, proven best practices that have been shown to produce superior results, and guidelines for streamlined production workflows.

Saturday, January 30, 2010

Travel and Leisure trip with Lisa

Lisa and I traveled to St Augustine to do a story about "Inns of Elegance" She is a writer and I worked on some images for the article. We stayed at the St Francis Inn the oldest continually operating B&B in St. Augustine. We were with a Group of 17 travel writers and had a great time meeting new contacts and learning some new tricks to add to our tool box. Here are a few quick images, More to come!